December 15, 2010

Trend Watch: Union Jack

My media room is my husband’s domain, but I like to keep an eye on the decor. I am thinking about snatching up some Union Jack flag pillows for the sofa…I think they fit the dark masculine feel of our media room. Currently we have navy walls with white trim and chocolate carpet and furnishings. It’s a bit nautical looking which I think will work well with the Union Jack Pillows!  I think they’ll look perfect on our Restoration Hardware sectional…it was a splurge and well worth every penny!
 
Love these Jonathan Adler British Flag pillows…such a bargain!


I love this ottoman from Dovecote Décor’s new online store…If I didn’t already have an ottoman upstairs…this would be an awesome addition!

Love this sofa!

Fabulous!

I think this Jonathan Adler Zebra British Flag rug would go great in my son’s bedroom.


December 14, 2010

Lara Spencer Fab Modern Home

I fell in love with Lara Spencer when she was on Kathy Griffin: My Life on the D-List redecorating Kathy’s Hollywood Hills home. I instantly had to see more of Lara’s home in Beverly Hills. I love the fact that she kept the original gray terrazzo floors and the rotunda entryway.  My favorite room in the house is the living room with its turquoise and yellow-green color scheme…my absolute favorite two colors! 

I also adore the fact that she kept the see through fireplace!

Check out more of Lara


December 13, 2010

Holiday Lights

I love driving home each night and seeing the house all decked out in lights! It really brings a huge smile to my face each time I turn the street corner. Last year we got a bargain on all of the lights and I was surprised that we used every last box! One trick we learned when putting the lights up was to use hot glue to attach the lights around the brick/stone. It easily peels right off when we are done and requires nothing special.

This year we also added shatter-resistant ornaments to the garland. It really looks gorgeous!


Last night I also tried to take some pics of my kids for our annual Christmas card. I make every single one by hand and was thinking about scaling back this year, but was touched when someone told me how they hang it up at their office.  I guess I will have to crank them out this weekend! I will upload pics of last year’s card for those of you that need inspiration. I had some monogramed stamps made at Zazzle.com…I can’t wait to use them on the envelopes.


Classic Louis


I cannot wait until Friday! Not only do I get a whole two weeks off to rest and spend time with my family, but I get a chance to catch up on all the projects that accumulate in my home. This time I am determined to finish my dining room chairs that I have had for over a year. They are a classic Louis XV French style chair...but definitely made sometime during the 90's. I have already stripped the wood and plan to finish them with a coat of white paint or stain. Check out my inspiration photos! I am most likely going for a rust-orange velvet or mohair…
My dining chairs BEFORE!
 
Love the leather with white finish!

Yummy Chocolate...


Love the color of the leather...my fav color!


Black on Black...instant classic!


December 12, 2010

My favorite holiday!

My absolute favorite time of the year is…Christmas! I love the spirit of the season and of course the redecorating of the house inside and out. This year we decided to tackle the outside of the house even though it meant climbing a 30’ ladder to reach the highest peaks of the roof. It turned out great….my daughter exclaimed, “I thought I was walking through a catalog!” I’ll post some pics tomorrow!
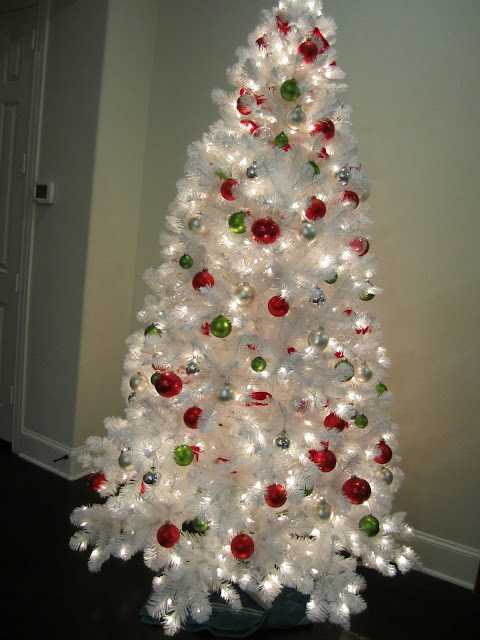
My favorite part of decorating for Christmas is of course decorating the Christmas tree. We have 2 trees in our home, one upstairs for the kids and one downstairs that everyone can enjoy. I finally went out and bought a new white tree this year because my old white tree was beginning to look a bit dirty and yellow…not exactly emanating the Christmas spirit. Here are the steps I use to make sure my tree looks fabulous!
  1.  Fluff and separate all of the tree branches…I know this takes a lot of time, but it is well worth the effort and scratches! It makes the tree look fuller and separates the light strands.


2.   Add in any garlands/ribbon that encircle the tree…mine is an easy red and white felt garland that my kids and I made a very long time ago that cost next to nothing!


3.       Time to add in all of your round glass ornaments. The trick is to evenly space the ornaments on the tree…this year I used red, apple green, silver, white, and iridescent ornaments of all sizes. I especially love when my old ornaments start to age, but I always do manage to break a few every year.


4.       Now is the time to add in all of your additional ornaments…I collect these every year in groups of 5-7(odd numbers always look best!) after Christmas for very reasonable prices. Make sure to space these out evenly around the tree as well. I even add the white paper snowflakes that I made during Christmas of ’99 after my son was born and we didn’t want him to break the ornaments on the tree. I keep them in a special box and they look as good as new every year!